This page describes an older setup of Plane/Sailing's AIS receiver, using rtl_ais and AIS Dispatcher. I now recommend AIS-Catcher, with which I see much better performance, instead of this setup.
The information on this page has been preserved for reference. If you would prefer to use the superior AIS-Catcher solution, click here.
Installing rtl_ais
rtl_ais is a simple command-line utility that does the complex job of interfacing with an RTL-SDR dongle and decoding AIS data, providing it on as the standard NMEA-0183 format.
OpenPlotter maintains Ubuntu packages for rtl_ais, including for the armhf architecture which we need for the Raspberry Pi. You can download and install with e.g.:
wget https://launchpad.net/~sailoog/+archive/ubuntu/openplotter/+files/rtl-ais_0.4.2-stable_armhf.deb
sudo dpkg -i rtl-ais_0.4.2-stable_armhf.deb
If the download doesn’t work, visit the page and see if it’s because a new version has been released.
If you prefer to build rtl_ais from source, that’s an option too:
sudo apt install librtlsdr-dev libpthread-workqueue-dev libusb-dev
git clone https://github.com/dgiardini/rtl-ais
cd rtl-ais
make
sudo make install
If the make throws errors, you may need to edit the Makefile line that begins “LDFLAGS” as follows:
LDFLAGS+=-lpthread -lm -lrtlsdr -L /usr/lib/arm-linux-gnueabihf/
(Thanks to Marc for reporting this, and linking to this page that provides some more detail on installing rtl_ais.)
Deconflicting Dongles
At this point, I plugged in my RTL-SDR and started to have an issue with dongle device indices. Previously, with just my FlightAware dongle installed, it had device index 0 and there were no problems. On connecting the second device for AIS, assumed it would appear with device index 1, and so I tried to run rtl_ais with the -d 1 parameter. Unfortunately it didn’t work! Looking at the output of rtl_ais and plugging/unplugging dongles showed that the new device had bumped the old one into index 1.
So while I found out that -d 0 was the appropriate parameter for rtl_ais, I then had to go back and change the index of the dongle that Dump1090 was using, by editing /etc/default/dump1090-fa, and changing --device-index 0 to 1.
I then rebooted the Pi to make sure the device indices stayed like that after a reboot, and they did. So Dump1090 can stay using device index 1, and rtl_ais will use device index 0.
Running rtl_ais on Startup
We then need to make sure this runs automatically on startup, by creating an init script at /etc/systemd/system/rtl_ais.service:
[Unit]
Description=rtl_ais
After=network.target

[Service]
ExecStart=/usr/local/bin/rtl_ais -d 0 -p 0
WorkingDirectory=/home/pi
StandardOutput=inherit
StandardError=inherit
Restart=always
User=pi

[Install]
WantedBy=multi-user.target
Then enable and start it:
sudo systemctl daemon-reload
sudo systemctl enable rtl_ais
sudo systemctl start rtl_ais
At this point it’s worth rebooting the Pi, and on startup, running both systemctl status dump1090-fa and systemctl status rtl_ais to make sure they both start up OK and don’t die like they would if they couldn’t access the RTL-SDR device index they were assigned.
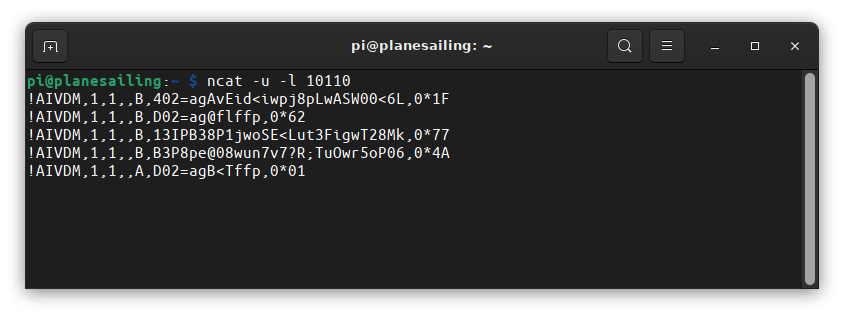
Checking NMEA-0183 Data
By default, rtl_ais outputs data to local port 10110 via UDP. We can use netcat to check we are receiving something:
ncat -u -l 10110
Your output should look like this:
Sharing your Data
Feeding your data to online trackers is a little less sophisticated for AIS than for ADS-B; each provider simply gives you an IP address and port to which you send the raw NMEA-0183 messages via UDP. rtl_ais sends data to only one receiver, and since we want to not just send data to Plane/Sailing itself but to other user-contributed data sites such as Marine Traffic, we need to re-send those UDP packets out to multiple ports on different servers.
While this could be achieved on Linux simply by using a combination of command-line utilities like ncat and tee, AISHub provides a dedicated tool for the job in the form of AIS Dispatcher. This has a few technical advantages in terms of down-sampling and rejecting of duplicate messages, and it also provides a web interface so you can visually check what it’s receiving.
After installing following its instructions:
wget https://www.aishub.net/downloads/dispatcher/install_dispatcher
chmod 755 install_dispatcher
sudo ./install_dispatcher
You can now access port 8080 on the Pi using a web browser and log in as admin/admin.
(If you see an aircraft map at this point, you didn’t disable Lighttpd in the instructions on the previous page! You’ll need to do that before running AIS Dispatcher, or else deconflict the ports manually.)
Now we can set up AIS Dispatcher. On the configuration page, set the input to be a UDP Server on port 10110.
For Outputs it comes preconfigured with the appropriate host and port to submit data to AISHub anonymously, but you may also want to sign up for an AIShub account and get a unique port to send to. The same applies to Marine Traffic; registration gets you a unique port to send data to, and other account benefits. There are also anonymous ports you can send data to for Vessel Finder, Pocket Mariner and Ship Finder.
To provide data to Plane/Sailing server, configure an additional output to 127.0.0.1, port 10111.
You can then set your location, and enable the server. You should also change the admin password, especially if exposing this server to the internet!
After a few minutes, you should see some ships appearing on the map.
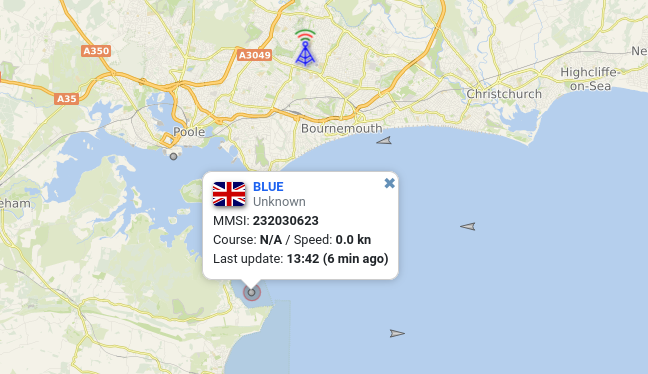 AIS Dispatcher Map
Add a Comment