I’ve been asked several times whether I would be attending various Nodecopter events, even more so now that the fledgling hackerspace I am part of is getting to know about my love of robots.
My reason for saying “no” every time is that it would tip me over the edge into buying things I can’t afford — and the AR.drone that Nodecopter events use wouldn’t even be the most expensive part of the build.
With the knowledge that I will probably not build this project any time soon, if at all, I figured I might as well put the design out there in case anyone else is up to the challenge (and the expense). So without further ado…
Introducing the ChromeCopter 2000
Despite the most recent inspiration for the design being William Gibson’s 2010 novel “Zero History”, the concept — and hence the name — belongs more to an 80s cyberpunk vision of the future; where the Internet overlaps with the world in the form of virtual reality cyberspace rather than app stores and push notifications.
This, I feel, is the closest we may get to “jacking in” in the next few decades.
Phase 1 — A Few Simple Parts
The initial “proof of concept” phase is technically simple, although unfortunately very expensive.
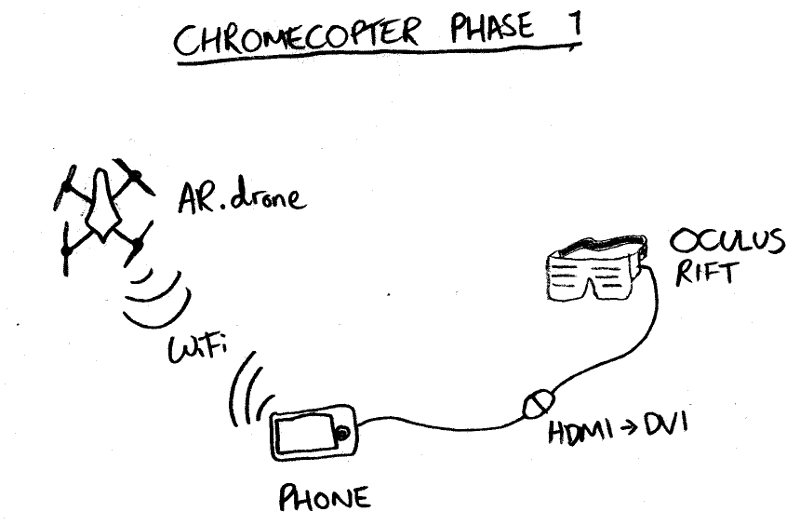
The AR.drone comes with a great Android and iOS app that allows you to fly the drone intuitively using the phone’s accelerometer and on-screen controls. The simple addition of a modern VR headset such as the Oculus Rift attached to the phone via an mini HDMI to DVI converter will give 90% of that “jacking in” sensation for 1% of the effort that Phase 2 will involve.
Aside from the price and the Oculus Rift’s lack of a release date, the big problem here is that the pilot will have to operate the phone’s on-screen controls — such as altitude — by feel alone because she won’t be able to see her own fingers.

Replacing that on-screen control with motion sensors is the other 99% of the effort.
Phase 2 — The Inevitable Raspberry Pi
The one limitation that stopped me rushing out to buy an AR.drone on release day was that it cuts a few corners to make it (relatively) cheap. Its props aren’t powerful enough to allow it to support a decent payload (read: onboard autonomy controller), and the core control software is closed and unhackable.
What this means is that any interesting capabilities have to be implemented off the drone itself. While this isn’t ideal, there is a decent SDK, and now there is a very popular Node.js ar-drone library on which Nodecopter code is based.
This is PC-based, so the logical place to start would be a PC that fits in your pocket — the Raspberry Pi.
(The AR.drone SDK also supports Android, so this bit would be possible with something like an Android phone and an IOIO board. This would rule out the use of Node.js, though.)
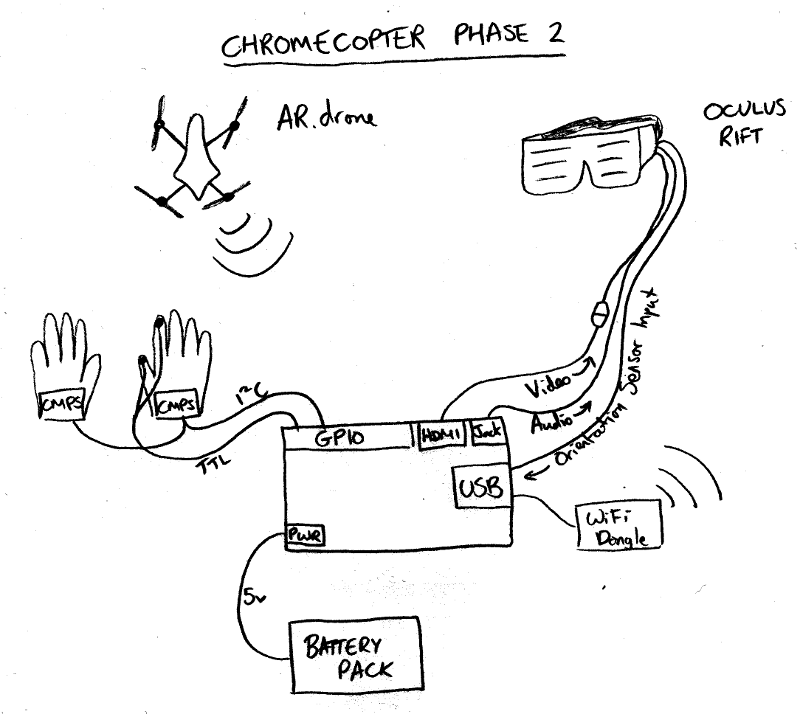
With the Raspberry Pi running Nodecopter software, it becomes pretty easy to integrate a number of sensors and feed the control through to the drone over WiFi. Plus, a portable “phone charger” type battery pack would make the processing module more-or-less pocketable.
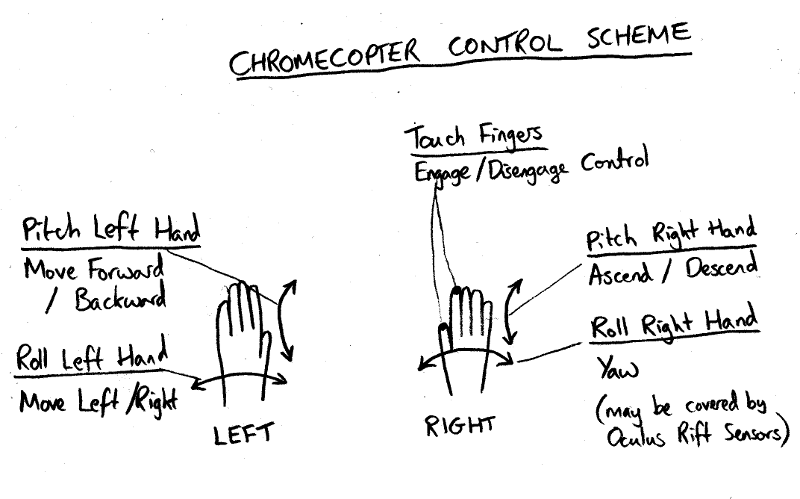
For the control of the drone, the feeling of “jacking in” is enhanced by applying control through body motion. The Oculus Rift includes sensors which could allow the pilot to rotate the quadcopter by rotating her head. Cheap solid-state magnetometers like those used in the Raspberry Tank can be embedded in gloves to control the three-dimensional motion of the drone. For example, tilting the right hand forwards and backwards could decrease and increase altitude.

Finally, a safe “hover” mode is required that will allow the pilot to move her hands without controlling and potentially crashing the drone. This could be achieved by metal contacts on the thumb and forefinger, which must be touching in order to actively command the drone.
These sensors can easily be fed into the Raspberry Pi via its GPIO port, with a C program exposing a TCP socket via which the Node.js code can retrieve the data.
When flying a drone, speed is of the essence, and a lot of work will be required to decrease the time between the pilot moving and the drone responding. Delays here can cause difficulty in piloting the drone, not to mention the possibility of motion sickness since the pilot’s field of view consists only of the (possibly delayed) video from the drone.

In Summary
That’s my crazy cyberpunk invention of the week. As a design, its BOM cost of over £600 puts it out of my price range for now — but if anyone else builds something similar before I get the chance, I’d love to hear about it!
Comments