A while back I purchased a Retevis RT-3S radio, as I wanted to try out the OpenGD77 firmware’s advanced features for working satellites. I have now managed to flash the OpenGD77 firmware onto the radio, thanks to the information detailed on this page, this official thread and this video. However, from my perspective each of them was missing a step somewhere, or did not have quite the complete set of information that another had.
In case it’s of any help to others, I thought I would write up the exact set of steps I followed, as a synthesis of all three sources, which resulted in my RT-3S (GPS model) successfully booting OpenGD77. They are as follows:
- Use Windows 10 or 11 on the host computer
- Download and install this driver
- Connect the radio to a USB port
- Turn the radio on
- Open Device Manager and verify that the radio appears under “Universal Serial Bus Controllers” as “STM Device in DFU mode” and not “Digital Radio in USB mode”. (If not, disconnect the radio, reinstall the driver, reconnect the radio, and try again.)
- Download the Retevis RT-3S CPS software from here, selecting EU and then the RT-3S
- Unpack and install it
- Run the Retevis CPS software
- Press “Read” to read the current settings from the radio
- Save them as e.g.
Stock Firmware Codeplug.rdt - Press Ctrl+T and wait a few seconds for the Test/Calibration data to appear
- Save that as e.g.
Stock Firmware Calibration.txt - Exit the Retevis CPS
- Download the OpenGD77 CPS from the pinned post in this forum and install it
- Download the official firmware as a “donor” from here, and unzip it
- Download the latest OpenGD77 firmware from here, choosing the file named
OpenMDUV380.zip. (You do not need to unzip it.) - Turn the radio off, leaving it plugged in
- On the radio, hold down PTT and SK1 (the small soft-key button above PTT). With those buttons held down, turn the radio on. This will put it in firmware update mode and the LED will start flashing green and red.
- Open the OpenGD77 CPS software
- From the Radio Type menu, select the option that includes RT-3S
- From the Extras menu, select Firmware loader
- Select MD-UV380/RT-3S from the list of radios
- Click “Select official firmware (donor) file” and locate the file named exactly the same as the one it wants from your unzipped donor firmware directory. (Even if you have the GPS-enabled RT-3S, do not select the one with “GPS” in the name - the filename must match exactly the one it wants.)
- Click “Select Open firmware file and update”. Select the
OpenMDUV380.zipfile. The flashing process will begin automatically. - The radio will reboot and a message on screen will say “Settings updated”.
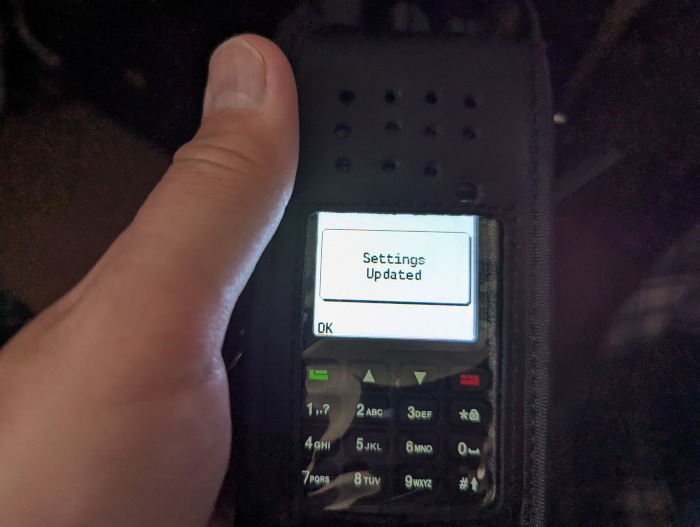 The “Settings updated” screen shown after a successful flash. If it looked like the flash was happening but it rebooted to the stock firmware, check the radio is properly in “firmware update” mode (green/red flashing light) and try again.
- In OpenGD77 CPS, from the Extras menu, select OpenGD77 support. Then click “Backup Flash”, and wait a few minutes for it to complete. Save the file. This produces a backup copy of the radio’s memory; it is essential to have this if you ever want to revert to the stock firmware.
- Click “Backup Registers” and save this file.
- Click “Backup MCU ROM” and save this file.
- (Optional) Click “Install satellite keps”, and click OK on the dialog box once complete.
- (Optional) Download your choice of voice prompts from here, e.g.
english_uk_amy-normal_UV380-like.vpr. Click “Write voice prompts” and select the file. - (Optional) Download an example codeplug for the radio to use as a starting point. I used this one from M7SPI.
- Exit the OpenGD77 Support dialog, and within OpenGD77 CPS, click “Open”. Select the codeplug you downloaded.
- Customise the settings as you like, in particular set your callsign and DMR ID if you have one. (If not, you will need to register one at RadioID before using DMR functions.) Adjust the channels to your liking, remove repeaters from places you never visit, etc.
- Click “Write” (red arrow) from the toolbar.
- From the File menu, save your codeplug as e.g.
My Codeplug.g77 - Power off the radio and remove the data cable.
- Power on the radio. You’re done!
And useful hints for new users of the firmware (including myself, at time of writing!):
- The Red button toggles between memory and VFO modes, or exits out of the menu
- The Green button enters the menu, and goes down into sub-menus
- The Up & Down buttons control squelch in analogue mode, and move through the menu
- The VFO/channel knob (left) changes the value of the highlighted option in the menu
- There are many more shortcuts to different features, see the graphic here.
Comments