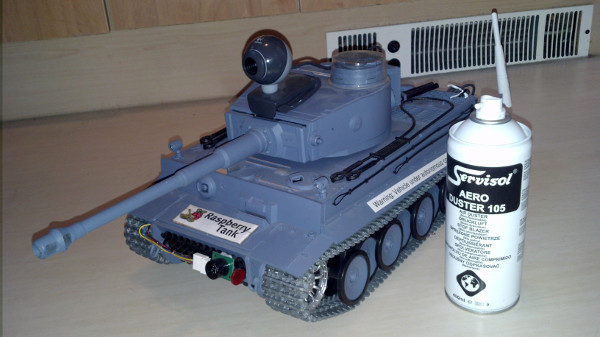
It’s been a while since the last Raspberry Tank diary entry, so the first step today was to dust off the tank—literally. And why use a duster when you can use a can of compressed air!
One of the problems that is stopping the Raspberry Tank being as fun as it could be is its battery. As shipped from the Heng Long factory, the Tiger I tank has a 1700mAh Ni-Cd battery. The specs of this battery aren’t detailed anywhere, but I assume it was specced to be as cheap as possible while being capable of supplying the main drive motors with the ~6A of current they need at peak. Out of the box, this gives the tank about 30 minutes of play time before the battery needs to be recharged with its dubious Shenzen special charger.
The Raspberry Pi, webcam, wifi dongle and I2C components we have added to the tank, combined with the innate inefficiencies of the voltage regulators, are drawing a constant current of roughly 2A from the battery, resulting in a “play time” of only around 15 minutes. It also seems that the peak current draw from the battery is not much above 6A, as when the motors are engaged while the battery is low on charge, the electronics “brown out”—there extra current draw drops the supply voltage briefly, and the Raspberry Pi locks up.
There’s a simple solution to these problems—replace the battery.
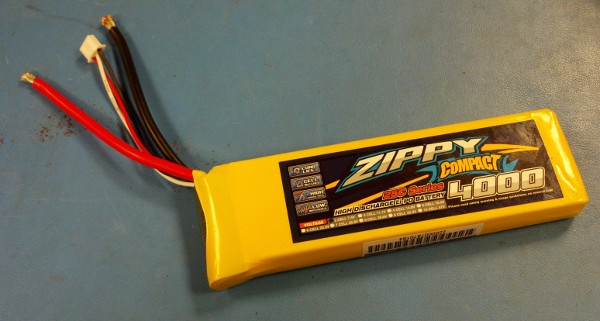
There are batteries that have a much greater energy density and a much bigger maximum current draw and are available very cheaply. I chose a ZIPPY Compact 4000mAh 2S 25C Lipo Pack battery which was around $20 with shipping. (But before you rush out and buy one for your own build, you need to read the rest of this page first!)

The 4000mAh capacity will give us more than double the play time, while the 25C constant, 35C peak discharge rate means that the Raspberry Tank could draw a constant 100A from the battery—far more than it needs (at least until we replace that BB gun with a railgun…)
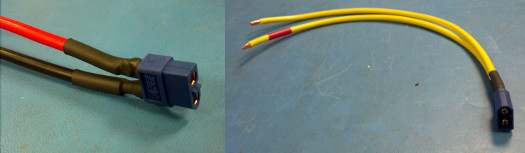
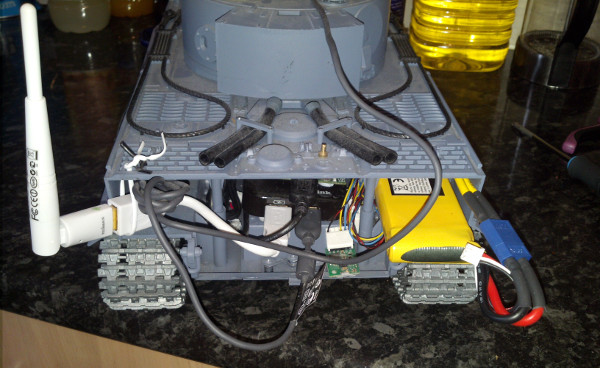
You may notice the connector has been removed from the battery in that image, leaving bare wires. The battery comes with an HXT discharge connector, which is different to the Tamiya connector on the tank. Rather than swapping one with the other, I chose to replace both with the much smaller, neater XT60 connector.
It probably goes without saying, but be incredibly careful when doing this. I wandered around the building with those battery terminals stripped back, and managed to touch them together with my thumb—in front of a bunch of electrical engineers, no less. While I look forward to a future of never living that down, don’t make the same mistake yourself. It could go a lot worse!
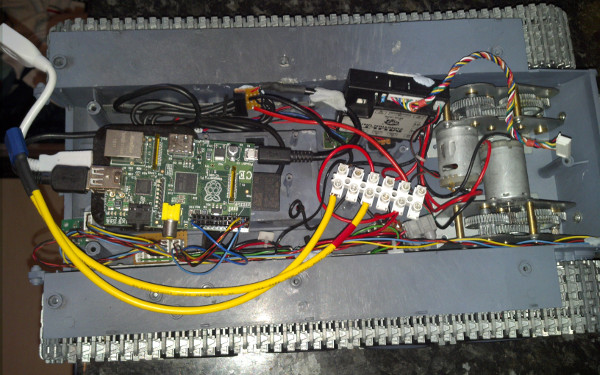
I chose thick 12 AWG wire here, but you can and probably should use something smaller. 12 AWG is a nice fit in the XT60 connectors, but the wire is very stiff and does not bend well inside the tank, as you can see in the following photo.
Rather than re-soldering my new wires onto the tank’s power switch, I chose to instead put them into the choc block that joins the other common power lines inside the tank. Heng Long’s standard of soldering is almost as bad as mine, and I didn’t fancy my chances of making a good connection, especially since the switch is glued into the tank chassis and cannot be removed.
Here comes the reason why I told you to wait before buying that battery—it’s too long. I measured the Tiger I’s battery compartment as 135mm long, then forgot all about it and bought a battery that was 145mm long. If you’re following along, you may want to buy a different battery.
I contemplated drilling out the end of the battery compartment, but for now I have installed the battery inside the main electronics compartment, above the right-hand tracks. Luckily the shape of the tank leaves a lot of space inside, but it’s becoming apparent that the rear panel of the tank is never going to get attached again!
This is what the Raspberry Tank now looks like from the rear:
Combined with the second identical battery that I bought at the same time, the Raspberry Tank now has nearly an hour of “play time”—perfect for evenings at the hackerspace. Power brown-outs are also a thing of the past.
Merry Christmas!
Comments
Hello. I have also really liked reading through your posts. so much so I have started my own project. although this is my first pi project.(I like to jump in at the deep end.) My problem is I ordered the tank before looking and dimensions, meaning mine tank is not as big as yours. so thinking a head I may have to rip all the internal wiring out and run all the motors and servos through a PWM controller which I think would offer me speed control.
My question is do you think it would work trying it this way? if so would yours work running it this way?
Thanks Joe
I know there's a 1:24 scale version as well as my 1:16, so I guess you have that? I'm not sure how much space the 1:24 has inside, but hopefully you'll be OK—there's plenty spare in mine really, I just haven't used it efficiently!
Taking out all the original electronics and doing your own motors / speed control is definitely not a bad plan, and I'd like to do that eventually in my tank too, I just haven't got around to it yet! My method of reverse-engineering the control codes (as you may have seen on this blog) was an "easy" way to get control, but it leaves you stuck with doing what the RX18 board will let you do. As you say, redoing the electronics yourself will give you proper speed control of the motors, which will result in much easier control.