One issue I have sometimes seen with the Big Mouth Phatt Bass when running from internal batteries only is that high levels of motor drive (e.g. having the head out and the mouth moving) can cause the ESP32 board to glitch and restart. I assume this happens because we are drawing power for it from the 4.5V line (3x AA batteries) and the extra current draw from the motors causes this line to drop below a voltage that the on-board regulator is happy with.
This doesn’t always happen for me so I suspect it is related to how full the batteries are. 6V is really a hard requirement for the fish to move normally, so I have to use non-rechargeable alkaline cells to get that “true” 1.5V per cell compared to rechargeable NiCd cells at 1.2V. With fully charged alkaline batteries, you should see the full range of motion like so:
However, as the batteries start to drain, you may find reduced motion or the board restart problem starting to occur. If this is a common problem for you, you may want to find a workaround. This page presents a few ideas.
Other Battery Chemistries
There are some newer AA battery chemistries that you could try for improved current supply characteristics such as NiZn or Li-ion cells with internal 1.5V buck converters. Lithium batteries generally keep a stable voltage with much higher current draw than alkaline, so I bought and tried these, however I found them if anything worse than normal alkaline cells. Your mileage may vary. Note that NiZn or Li-ion batteries require their own bespoke chargers. Typical “rechargeable” AA batteries are NiCd cells, and their chargers will not work for the newer alternative chemistries.
USB Power
Since I already have a hole in the back of my Bass for USB connectivity, I have just left the USB cable attached so that it can be connected either to a computer or to a USB power pack. This seems to supply enough to keep the ESP32 running regardless of the motor current draw, and in fact even seems to improve the motor speed a bit too. This is fine for my purposes (quick demos and frequent reprogramming), but if you are recreating the project at home and plan to put your Billy Bass on a wall, this won’t be a good solution for you.
Power the ESP32 from 6V
It should be possible to power the ESP32 Devkit board from 6V (i.e. all four batteries), as the regulator on the board is said to cope with this. (Note the same is not true for the MP3-TF-16P from the Phatt Bass or the MAX98357A from the Bluetooth Bass.) This may keep the board up and running through the voltage dips as the motors draw current. However, I have not tried this and you should proceed with caution if you want to try it. There are so many versions of the various ESP32 Devkit boards that you should also check the datasheet for your specific board thoroughly, as specifications for voltage regulators could be different between boards that have the same pinout.
I have also read that the pin labelled “5V” can be coupled direct to the USB 5V line on some boards, meaning that if you power the board from the fish’s 6V line, power on the fish, and connect via USB, you are then pushing 6V back up the cable to your computer and could fry your computer’s USB controller.
If you want to try this mod, there are a couple of ways you could go about it:
Option 1: Schematic & PCB Redesign
You could rework the schematic and the PCB to change where the supply to the ESP32 comes from. If you’re going down this route, I recommend doing it “properly” and getting all the labels and net classes correct in the schematic first; the PCB design phase will then check for you that you’ve used the correct track widths and won’t let you connect the wrong pads together.
If you’re going to this length, you may also want to introduce a small inline switch as an extra protection against accidentally leaving the fish switched on when you connect via USB—you can set it to 6V mode when the fish is packaged up, but break that connection to set it to “USB mode” when flashing it and testing it connected to your computer.
Option 2: Aftermarket Mod
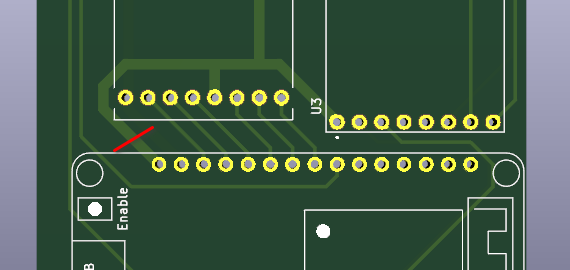
If you’ve already got your PCB made, you could try modding it by cutting the 4.5V trace that supplies power to the ESP32. This is on the front of the board (where the component itself is) and can be cut with a few strokes of a sharp knife. Use a multimeter to check that the trace is definitely broken and the two sides are no longer connected. You can then attach a wire on the bottom of the board from pin 1 of the motor board to pin 1 of the ESP32 to bring 6V there.
So on the front of the board, cut this trace:
Then on the back, add a wire here:

However, please note that I have not tried this myself! I think it should work, but you try it at your own risk—and if you break your computer’s USB port by accidentally back-powering it with 6V, that’s on you. Be careful!
Comments