Since I started doing POTA earlier this year, my go-to antenna has been a 20/40m dipole in an inverted-V configuration, the central pole being about 6m high. I like the simplicity and efficiency of a dipole, along with the knowledge that it was cut to the right resonant frequencies and isn’t going to change.
The one key disadvantage of this setup is just that—the setup. I’ve been lucky enough to have company on all my previous activations, but if I wanted to go solo, I would really struggle to get the mast up and guyed by myself. With that in mind, I started thinking about self-supporting verticals. The usual “make or buy” debate came up, and as usual I settled on “buy”, as for POTA I much prefer kit I know I can rely on.
I decided to buy one of the many “PAC-12” clone antennas available on AliExpress, specifically this one. At the time of purchase the headline price was £81, and including tax and shipping the total cost was £98. It arrived in 8 days and luckily I didn’t get stung for customs duty, despite the package being honest about the contents and value!
In the UK, they can be found for £150 on Amazon, or MLS will sell you one for £160 including 10m of coax. I felt that saving £50 was worth the risk and went for AliExpress.
Now despite calling this antenna a “PAC-12 clone”, and being advertised under that name, I’m not completely sure that it is a true clone. What I received was labelled “JPC-12” and looks identical to other similarly named kits online, but looking up the original PAC-12, there are definitely some key differences in the size and tapping of the coil, and the use of extension rods.
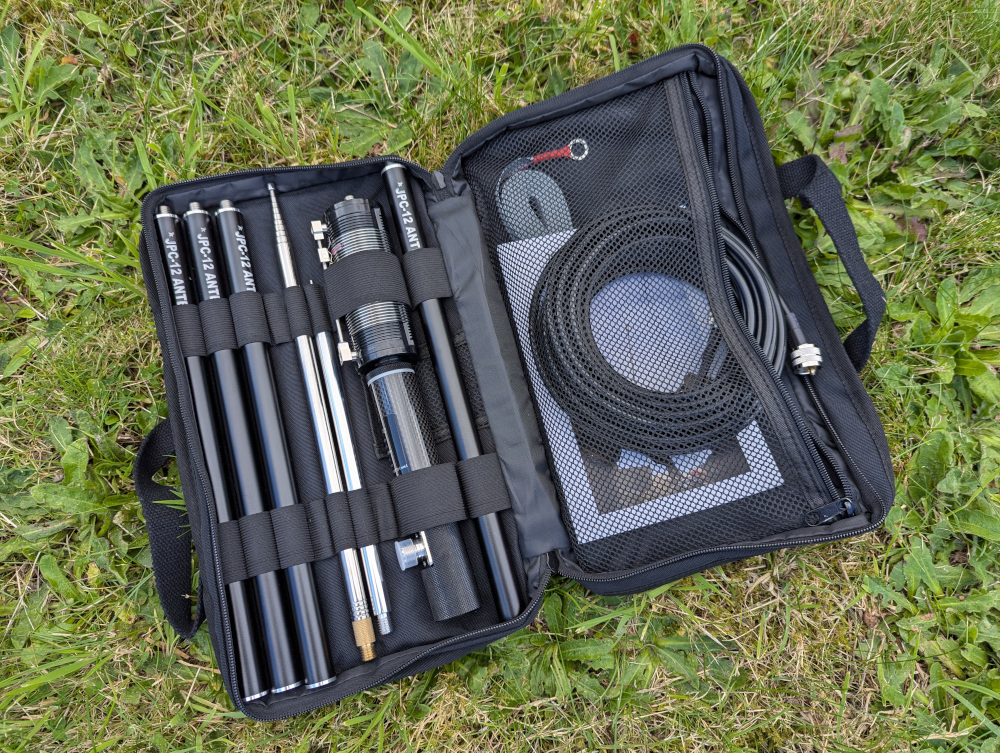 The antenna kit in its bag. (The coax was mine and did not come with the antenna.)
The kit comes well packaged in a fairly rugged-looking bag, a key advantage for my hiking-focussed POTA adventures. (As a bigger bit of kit than my dipole antenna, it may end up strapped to the outside of my rucksack rather than carried inside.)
Assembling the antenna is fairly simple. The instructions aren’t bad for a Chinese product but the picture on the cover is worth a thousand words.
- First, the spike is inserted into the ground.
- Next, the ground radials are attached by placing the ring terminal over the screw thread in the ground spike. The radials are actually a strip of ribbon cable, which needs some separating out before use.
- The connector block is then screwed down onto that. It’s the piece with female screw thread in each end and the SO-239 connector on the side.
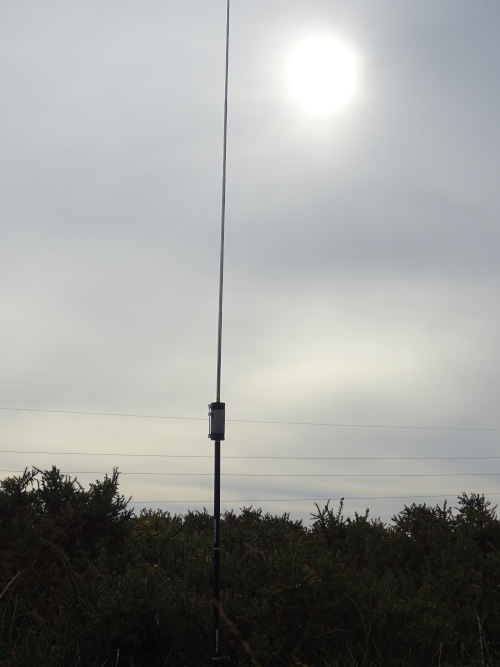
- Then, depending on band, the extension poles are attached to the top.
- Again, depending on band, the loading coil is attached on top of that.
- Finally, the telescopic whip goes on top.
Until I started putting it together, I was thinking that the extension poles were just to increase the height of the base of the antenna. However, once assembled it’s clear that these are part of the radiating element, and the loading coil is halfway up the vertical length of the antenna rather than at the base.
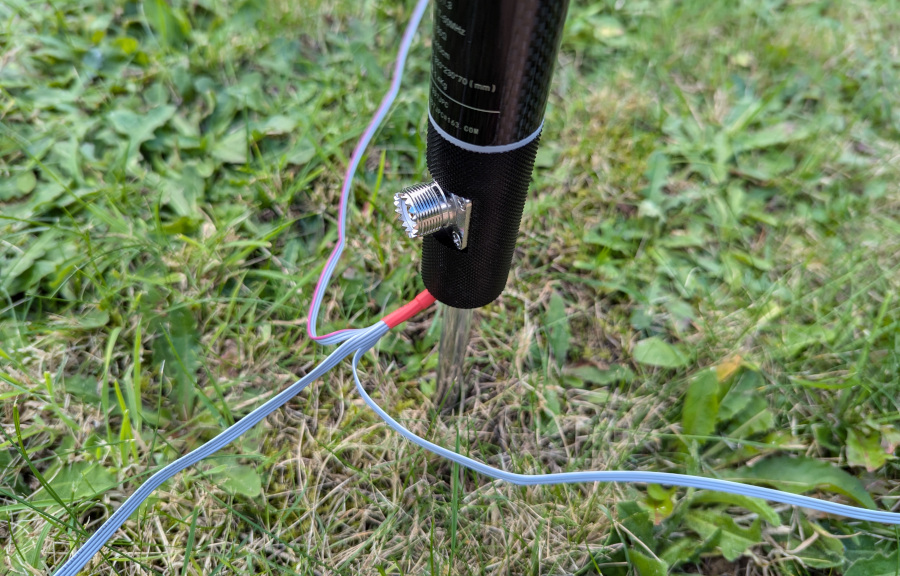 The base of the antenna, showing SO-239 connector and attachment of the ground radials.)
I’m not entirely sold on the idea of ribbon cable as radials. It comes nice and neatly packed in the bag, but after separating out into a number of sections and spreading it out, it’s going back into the bag as a tangly mess.
After reading a review on QRPer.com by Barry, KU3X I was worried about the length of the radial ribbon cable too. It is indeed about 18 feet (or 5 metres), which is plenty to fit into my small suburban garden for testing, but as he states, a bit too short for operating on the 40m band. I’m nervous about large radials as a trip hazard out in the field, but I may have to make my own as he did if performance on 40m doesn’t hold up. (As can be seen below, SWR seems fine, but the radiation pattern could be questionable.)
Coming from a known-good wire dipole antenna, I was somewhat dreading having to figure out the tuning on this kit in the field. I don’t have a portable tuner for POTA adventures and I don’t relish the idea of taking the NanoVNA out with me either, so I tried to get some working settings that I could reproduce later. (In practice, I took the VNA anyway the first time.)
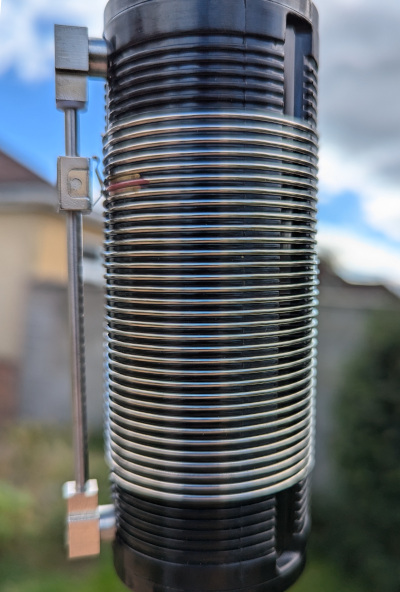 The adjustable loading coil.
I did find the adjustable loading coil quite difficult to use. There’s just a bit too much force required to start that slider moving, and it’s not easy to line it up so that it is touching exactly the coil you want, and not the next one too. The manual warns you to ensure you are only touching a single round of the coil, though I’m not sure it really matters too much. Electricity is going to flow via the shortest route, so touching the next round up doesn’t seem to make a lot of difference.
The manual does give you suggested configurations of extension poles, loading coil and whip lengths to get you started on some of the key bands, and positions of the slider on the loading coil are marked.
In practice I found the sweet spots for tuning weren’t quite where the manual indicates they should be, but they were pretty close.
Tuning for the top end of the 20m band where I spend most of my time doing POTA, I found the best match by using all for extension poles as indicated, then putting the tuning coil one notch lower than the marked (gold) position, and having the whip fully extended minus about for finger-widths.
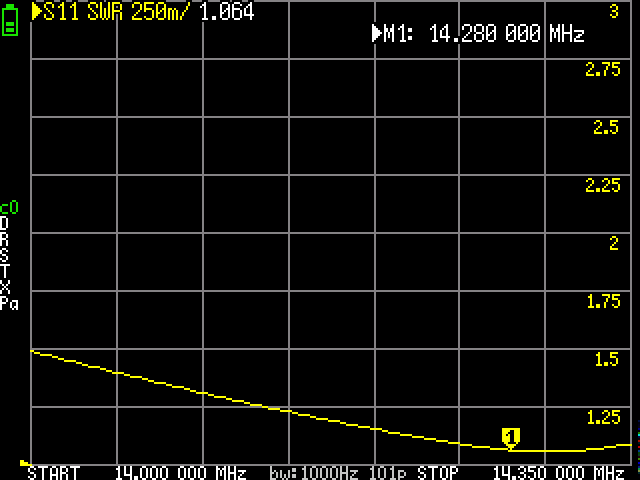 NanoVNA screenshot showing SWR on the 20m band.
It’s a bit simpler to set up for 10m, but again I didn’t find the spot quite where I expected to. Instead of a fully extended whip and nothing else, I needed a bit of extra length so included one of the four extension poles, then shortened the whip by one whole section. It’s not a perfect match, but it should get the job done.
 NanoVNA screenshot showing SWR on the 10m band.
On 40m, my other preferred POTA band, things were a little more confusing. In my initial testing in my garden, I managed a SWR of about 1.2:1 over a portion of the band by again bringing the coil slider one notch down, then shortening the whip accordingly to bring the resonant frequency back into band.
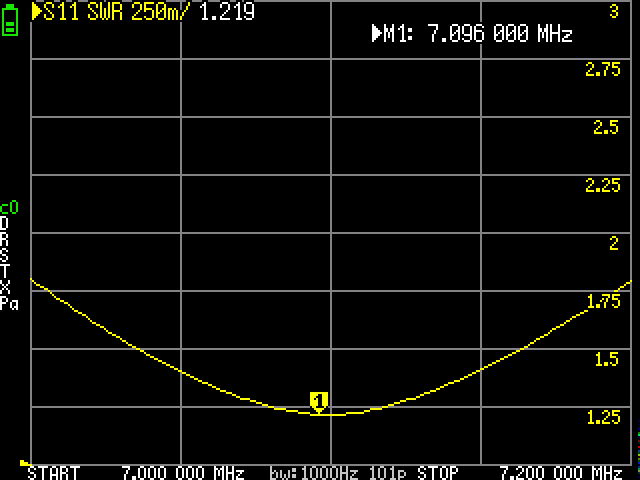 NanoVNA screenshot showing SWR on the 40m band.
However, when I headed out into the field, I found I couldn’t replicate this at all. I’m not sure what was different, but I couldn’t get a match anywhere under 2:1. I guess I will need a few more outings to try and figure out what’s going on there.
One more minor annoyance I should mention is the height of the overall assembly when the extension poles and loading coil are fitted. When I needed to adjust the length of the whip for tuning, I was just about able to. Anyone much shorter than my 5’ 10” (178cm) might struggle to reach, and need to dismantle part of the antenna in order to tune the whip length.
Overall, I’m happy with this antenna and certainly feel like I’ve got my money’s worth. It’s a neatly packaged kit, and everything feels solidly well-made.
On my first activation with it, I did suffer a bit with the extra weight of this antenna compared to my usual wire dipole and 6m pole, although part of this could be attributed to the needlessly hefty LMR240 cable I used it with. It’s also bulkier than my dipole kit, filling up even more of the bag and taking my total POTA pack weight up to nearly 10kg.
However, it’s a lot easier to put up than the alternative when activating solo, and not needing guy ropes means a lot less wading through knee-deep heather and gorse. So, I’m sure this will become a regular part of my portable kit.
Comments