They say something about “standing on the shoulders of giants”, and this project is no exception. Making an ADS-B receiver with a Raspberry Pi is not an uncommon project, and there are plenty of resources out there to help set one up. In the original “version 1” of Plane/Sailing, I used FlightAware’s pre-configured “PiAware” disk image to be the easiest way of getting started. For version 2 I wanted complete control of my own OS installation, so I started from scratch with a base Raspberry Pi OS image, but even when not using the PiAware image, FlightAware’s repositories are still the best way to get the right packages installed.
If you’re replicating this build guide, now is the time to plug that first FlightAware Pro Stick or RTL-SDR v3 dongle into the Pi. Let’s track some planes!

Dump1090
The core of most ADS-B receivers is the Dump1090 software, which decodes the raw data provided by the USB dongle, and provides that data in a variety of formats to other software. It also comes with its own “SkyAware” web server so—if all you’re interested in is aircraft—it’s really the only package required.
Various forks of Dump1090 exist in source code form on Github, but FlightAware go the extra mile and provide compiled versions for the Raspberry Pi’s architecture, so by far the easiest approach to getting it up and running is to follow their instructions:
wget https://uk.flightaware.com/adsb/piaware/files/packages/pool/piaware/f/flightaware-apt-repository/flightaware-apt-repository_1.2_all.deb
sudo dpkg -i flightaware-apt-repository_1.2_all.deb
sudo apt update
sudo apt install dump1090-fa
This will automatically run now and on subsequent restarts, so it should be up and running already! You can use a web browser to visit the SkyAware web interface using the Pi’s IP address and port 8080.
Recreating this setup on an x86 PC instead of a Raspberry Pi? Here's where you may run into difficulty, because FlightAware's repositories only carry packages for ARM processors. You can build the relevant packages from source, or to save time use the pre-built ones referenced in this thread. Note the linked binaries are for Ubuntu 20.04/10, but the same Github account also has pre-built binaries for Ubuntu 22.04/10 as well as Debian and Arch.
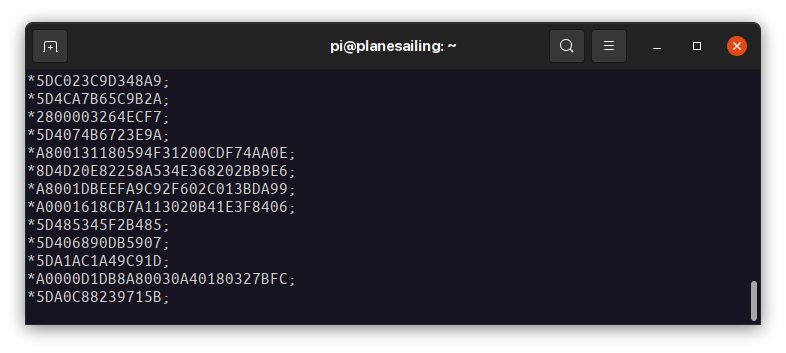
Checking Mode S Data
Plane/Sailing Server by default connects to Dump1090 on port 30002 to receive ADS-B Mode S data in hexadecimal encoding. By installing and running ncat, you can check this data is available:
sudo apt install ncat
ncat 127.0.0.1 30002
Your output should look like this:
Sharing your Data
One of the most common use cases for receiving ADS-B data is to upload that data to websites that handle it and provide global aircraft tracking coverage. They each have their own installable package that will make that happen, once Dump1090 is up and running.
Since we are already using FlightAware’s PiAware repository, we can just install piaware from there with sudo apt install piaware. If you’re moving from a different machine like I was when moving from Plane/Sailing v1’s Pi to the new one for v2, you will want to make sure your new Feeder ID matches the old one: sudo piaware-config feeder-id <your-id>.
Once you’re set up and registered with FlightAware, it will give you a nice statistics page showing the range your receiver is achieving, along with its directionality, weekly and monthly history etc, plus e-mail alerts if your system goes offline.
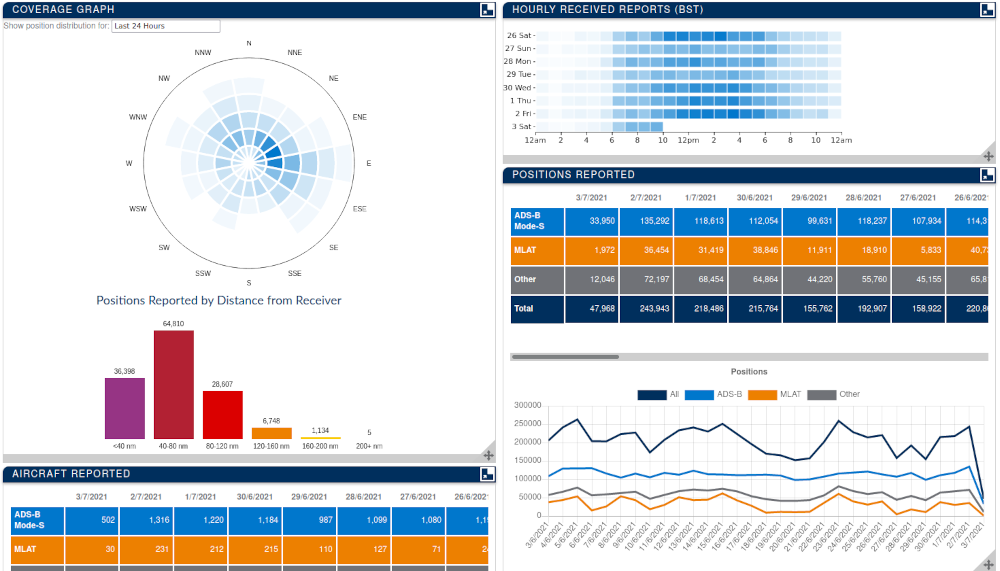 FlightAware Stats
Other community-sourced flight tracking websites offer offer their own packages for the Raspberry Pi that take the data from Dump1090 and send it to their own server. You can also install FlightRadar24’s feeder, ADS-B Exchange Feeder and OpenSky Feeder following the instructions at those links. They each ask you to download and run a script that will install essential utilities and then present a text-based interface for you to provide information such as the receiver position.
(When installing fr24feed, don’t panic if it says “You don’t seem to have any dump1090 installed”! It will properly detect it later in the setup process.)
Disabling lighttpd
Dump1090 includes a dependency on the Lighttpd web browser, which it uses to provide access to its web page. This runs by default on port 80 and 8080, the former of which we want to use for Plane/Sailing, and the latter is the default port used by AIS Dispatcher. Later in the build guide we will set up Nginx as the web server on the Raspberry Pi, because we want to use its easier HTTPS setup using Let’s Encrypt’s Certbot—a task that is nice and easy with Nginx but a pain with Lighttpd. If you’re following this guide yourself, once you’re happy that Dump1090 is set up properly, you will want to disable Lighttpd before continuing. You can do that with sudo systemctl disable lighttpd. Don’t worry, the guide also covers configuring Nginx to serve the Dump1090 pages as well.
We’re done with ADS-B setup!
Comments
Hi Ian, many thanks for your fantastic tutorial here. That is, what i’m searching for. Just start to read the pages, one question pops up, do you know ,if Piaware/dump1090 are supporting SDRPlay devices?
thanks Jo
Hi Jo,
It looks like SDRPlay have their own fork of dump1090 that’s compatible with their radios. It’s available on their downloads page (https://www.sdrplay.com/downloads/) and the source code is published (https://github.com/SDRplay/dump1090). It takes the extra command-line argument
--dev-sdrplayto put it in SDRplay mode.You shouldn’t need any special version of PiAware, it’s just dump1090 that talks directly to the radio.
If you’re interested in the AIS or APRS decoding as well, this project looks like it offers an SDRplay-compatible version of
rtl_fm, which will be useful.I can’t speak for how well these programs work, unfortunately, as I don’t have an SDRplay myself.
Hope that helps!