Day 15 of the Raspberry Tank build diary saw me on my home turf of UI prototyping, and I promised that today I’d show you how I put together the Javascript that powers the web-based user interface. Well, I did a little better than that – not only is the Web UI up and running, it’s communicating with a new version of the tank control software too, so now almost – almost! – have a fully web-enabled tank.
Step 1: The HTML
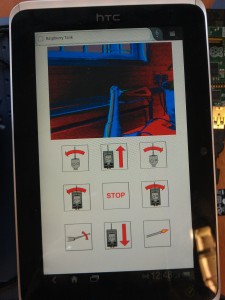
The HTML behind the tank’s web interface is pretty simple – just a big div for the webcam video and a 3-by-3 table of buttons for the control side.
Step 2: The Javascript
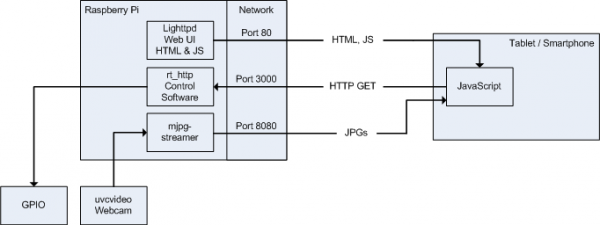
The webcam video is received as a rapidly-updating set of JPEG images using Javascript code that is part of the mjpg-streamer package. Although mjpg-streamer provides a mode that will deliver a live image without needing to constantly poll with JavaScript, this does not work on all browsers.
Each control button on the Web UI has an onmousedown and an onmouseup event that toggles a state internal to the Javascript. So, for example, the Javascript contains an internal variable that denotes whether the user has asked the tank to move forwards or not. Touching the “forwards” button sets this true, and releasing the button sets it false. Any time a change occurs, the complete set of command states are sent to an HTTP server on port 3000 as a GET request, where the back-end component of the software is waiting to receive it.
You can see and download all the web UI code on GitHub.
Step 3: The C
The early control code for the Raspberry Tank relied on keypresses to control the tank’s main functions. Now that we have a web interface, we need to modify the code to make it accept commands from the Web UI.
The Web UI’s JavaScript can only send HTTP requests rather than raw packets to something on the back end, so the easiest way to get control into our C program was simply to embed an HTTP server into it. This was achieved very simply by using a great, tiny server called mongoose.
Mongoose’s single C file was included in the build, and the code modified to include a Mongoose server spawned with pthreads, which wrote the command string it received from the Web UI to an internal variable. In the other, “old” section of code, the decision-making logic was changed so that rather than expecting keystrokes, it read that internal variable and issued control commands based on it.
You can see and download all the back-end code on GitHub too.
And so…
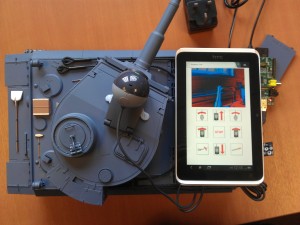
…now the Raspberry Tank can be controlled remotely from a web interface, complete with streaming video.
You may notice in these photos that the Pi is not currently inside the tank. There are a couple more issues that need to be addressed before full integration can occur, and these will be explained on day 17 of the Raspberry Tank Build Diary!


Comments
I found this project super interesting and I am now building something like this! I am just wondering if I could use the streaming video and process it using a C++ program for computer vision processing. Is that possible to port the mjpg out from the Script into the C++ program???
I'm sure it's possible, but if you want to run your vision processing on the machine that has the webcam, it's a little redundant since your C++ could just talk straight to the webcam.
Either way, it's a pretty standard format (either MJPEG if you're using the stream or uvcvideo if you're talking direct) so you should be able to grab a library that supports what you want. If you're using OpenCV for your processing, I believe it already supports both of these.
I have tried to run a OpenCV program on Pi but it turns out to be extremely slow, I am now trying to stream the mjpeg video (using mjpg-streamer) to an other PC for computer vision processing. Any clues I can start with?
I'm not sure I'm afraid - a quick search suggests OpenCV can only access local cameras or local files, not stream video over HTTP/RTSP/etc. There could be something you can stick in the middle to make OpenCV see the stream as if it was a local camera or file? Just a guess!
Hi Ian, I'm a bit confused on how I get your HTML code and java onto the rasp, if you could give me a quick tutorial because I'm such a linux noob.. sorry
Ian , where do you place your HTML files on the rasp so that they work on the external PC's browser ? :)
Sorry I took so long to respond, the notification emails for your comments got caught in my spam filter. (You would have thought I'd remember to whitelist my own website, but apparently not!)
The HTML files go in whatever directory your web server on the Pi is set up to serve from. If you're using lighttpd on something Debian derived (like me) this is likely to be
/var/www.Hi ian , could you explain me quickly how setup lighttpd to host the website ?
I'm building my own rpi tank , and I'm Going to use HTML until I make an android app :)
Installing lighttpd is very easy, if your RPi can be connected to the internet. If you are using a Debian-derived system like me, simply run
sudo apt-get install lighttpd
This will download, install and run the web server, and make sure it runs every time the RPi starts up.
As I mentioned in a previous comment, the "web root" for lighttpd is
/var/www. This means that you want to place the web pages that control the tank in there, and that will let you access them via a web browser.For example, if you place a file at
/var/www/index.htmlon your Pi, you can then access that via a web browser by enteringhttp:///index.html</code>.</p> I hope that helps, let me know if you need more information.
Ian wrote:
Hi Ian,
could you explaim me how to install your version of mongoose (I've get it from GitHub). I'm RPI-geek.
I've succed to install oryginal mongoose, but it have ptoblem with PHP and CGI...
I would like to build something like your great projest -raspberrytank.
But I have some problems with understanding linux and so on...
Pls, send me information how to instal mongoose form your GitHb and how to use it (part. C variable in it to affect on RPI GPIO)... Please, please please....
GeekRPI, building
mongoosefrom the RaspberryTank repository is very easy, because it happens automatically as part of thert_httpmakefile. So all you have to do is:cd rt_http && make
...and Mongoose will be compiled alongside the Raspberry Tank code itself.
However, if you're interested in PHP and CGI, the Mongoose server embedded in my code may not be the ideal solution for you. I'm not using it to serve files on disk—rather, I'm handling the queries internally in my code, and using it to drive the tank. My tank uses a separate
lighttpserver to serve the static pages of the web interface, because I can't get Mongoose serving both pages from disk and handling certain queries in my own code at the same time.If you are interested in PHP via CGI in Mongoose, it's supposed to be possible, although I've not tried it myself. This StackOverflow question is about running it on Windows, but similar things should be possible in Linux.
If you want a setup similar to mine, I recommend having both
lighttpdand Mongoose running side by side. It's not a great solution, but until it's possible to get Mongoose to do both internal query handling and serving static files from disk, it's the best we have.Ian wrote:
Thank you a lot for your answer.