My Home Meteogram Display is based around a Raspberry Pi and a small ultra-wide aspect ratio screen. It lives in the kitchen and provides a passive weather and calendar display tailored to our needs. The build process is documented below and all code is open source.
Goals
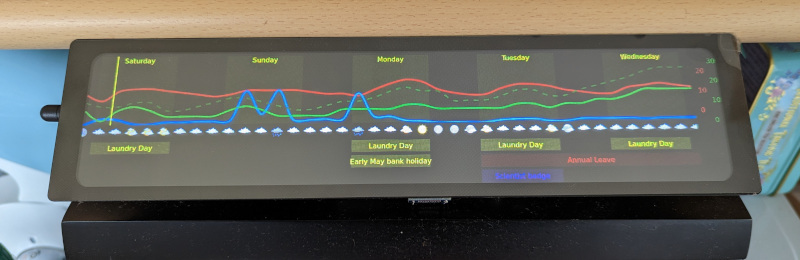
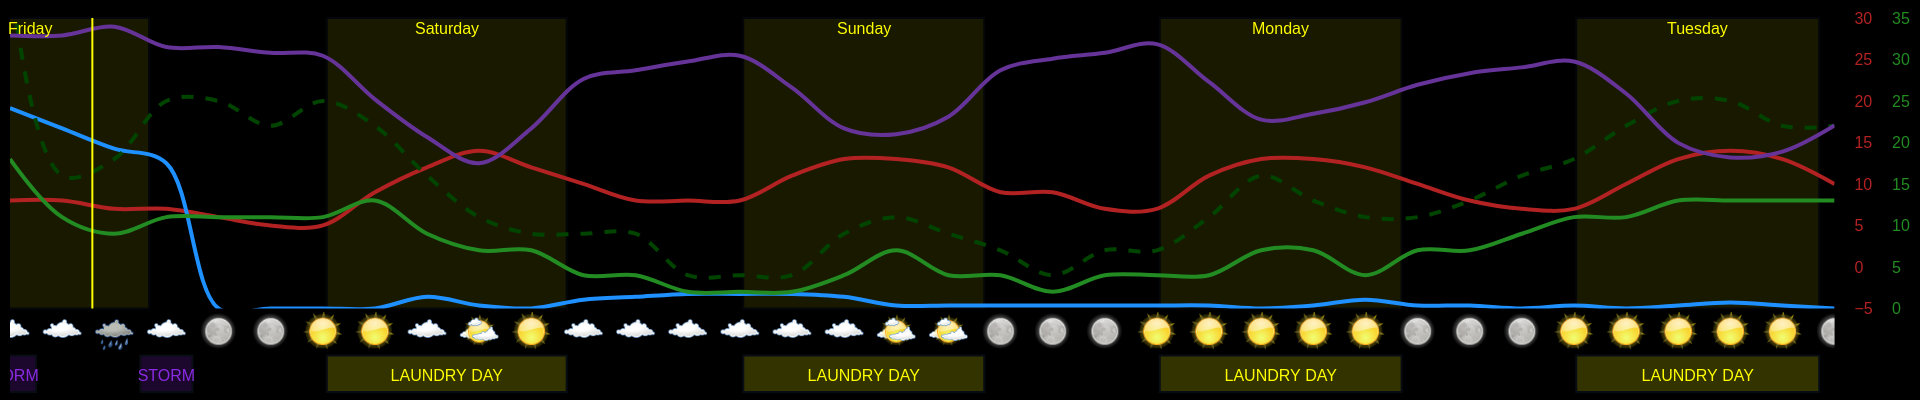
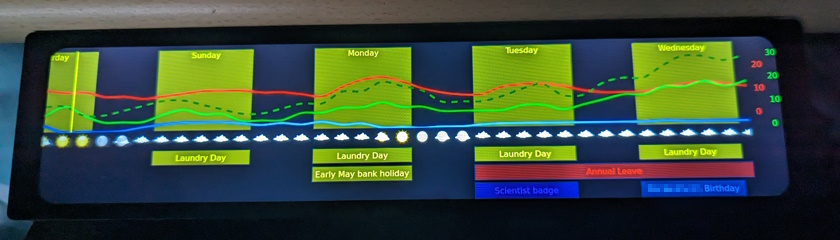
As explained in my earlier blog post, I came up with the idea of doing a Meteogram display to solve my issues with most weather forecast sites and apps: when a daily forecast says “lows of 0°C”, should I expect the frosty night to be the previous one or the following one? And with “90% chance of rain”, is that all day, or just starting at 10pm when I don’t really care? Whether trying to protect frost-intolerant plants, or just trying to get the laundry dry, not knowing is quite annoying. A meteogram is a very nerdy way of solving this problem, but it does solve it—by displaying a time series chart of temperature, precipitation, and other values.
While there are sites that will generate Meteograms for you, I decided to build my own software so that I could extend it, for example introducing logic to label good days for drying laundry outside, and overlaying calendar events so I can see them visually alongside the forecast.
Having these additional features on a passive display in the house means I no longer have to check the forecast on my phone to decide whether I need a coat with me, or to figure out day-by-day when I can get the laundry out.
Hardware Design
Despite the stated goals, this project largely came about because I saw these Waveshare ultra-widescreen displays and thought they looked cool, so came up with a project based around one.
An additional aim with the project was to use one of my original Raspberry Pi Model B units that is sat around gathering dust. The meteogram only needs to be regenerated once an hour, so it shouldn’t be a demanding task requiring a more recent device. However, using such an old computer did cause a number of implementation problems.
The good (and almost unexpected) news is that the original Pi Model B does output enough power over USB for both the touchscreen and a WiFi dongle.
The bad news is that despite claiming to be compatible with all Raspberry Pi models, the screen is only tenuously “compatible” with the original Model B—no suitable USB adapter board is provided, and the mounting holes don’t line up.
The low DPI of the screen (it is only 320 pixels high after all) is quite noticeable, so while it’s fine for this project, you will find that most GUIs designed for normal screens (even simple configuration dialogs) won’t be properly usable.
If you're looking to copy this project for yourself, I would recommend at least a Pi 2 rather than an original Model B, as you'll have connectors and mounting holes that match. If you're going all the way to a Pi 3 or 4, consider the DSI version of the screen instead for a neater install. You'll also be able to take advantage of the on-board WiFi on those models.
Software Design
With most of my recent projects being Java, C, and JavaScript-based, I thought I would use this as an excuse to get back into Python. I hadn’t done any real Python since my Fantasy Football team picker back in 2009!
The two main chart plotting packages for python appear to be Plotly and Matplotlib. I initially went with Plotly as it seemed more modern and with an easier-to-understand API. However, I ran into trouble when trying to get the script to run on an original Raspberry Pi with the armv6 architecture, because Plotly’s Kaleido dependency isn’t available for it and building from source was fraught with difficulty. I eventually gave up and rewrote it using Matplotlib anyway, which works fine.
I designed its output to be simple, rendering to a file which can then be displayed by a separate utility on the computer, rather than displaying its own screen or allowing any interactivity. This was another concession to use on an old device—I didn’t want to waste effort and processing power displaying my own user interface, when Linux already has many simple solutions for displaying a full-screen image.
I chose the UK Met Office’s DataHub API to provide the data for the meteogram, on the basis that I have found its forecasting the most reliable out of the many services available. It offers hourly and three-hourly forecasts over different time periods, which caused some complications on the programming side, but otherwise it is a reasonably easy-to-use API providing GeoJSON files over HTTP.
Bars below the meteogram itself were added to show logic-based conditions (laundry days & weather warnings) and calendar events sourced via iCal.
The software is tailored to fit the ultra-wide aspect ratio screen, but I have built it to be as customisable as possible, including over two dozen config parameters to set size, layout, features and colours.
The software is open source and can be found at https://git.ianrenton.com/ian/home-meteogram-display.
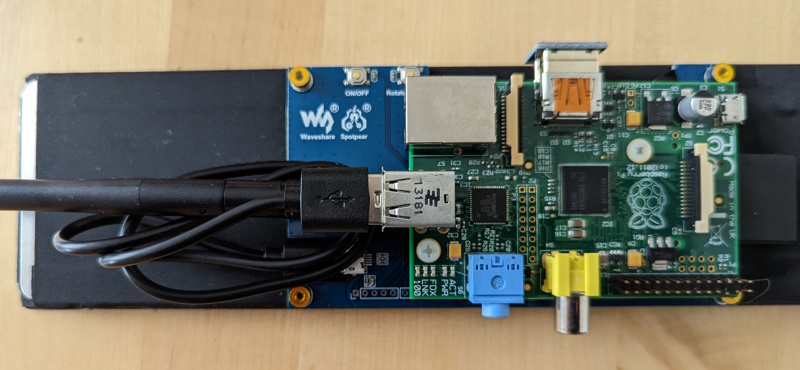
Hardware Setup
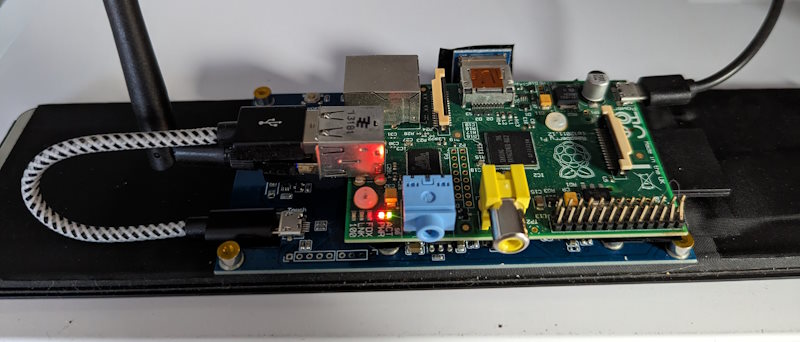
The first problem that becomes apparent when trying to integrate the screen and Raspberry Pi is that while their website says the screen is compatible with all models of Raspberry Pi, the fitting kit and the position of the mounting holes is only suitable for newer models. When attached using the HDMI-to-HDMI board, the USB-to-micro USB board does not line up:
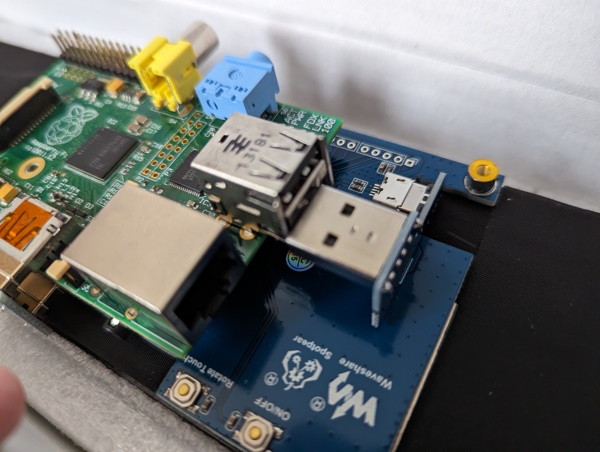
The short USB cable packaged with the screen was therefore required to connect the two. I also fitted a WiFi dongle at this stage:
Since the mounting holes in the Pi do not line up with the ones on the screen PCB, and we are only solidly connected using a single connector (HDMI), the Pi can move around slightly, and more worryingly the back of its GPIO pins can contact some of the metal parts of the screen’s PCB.
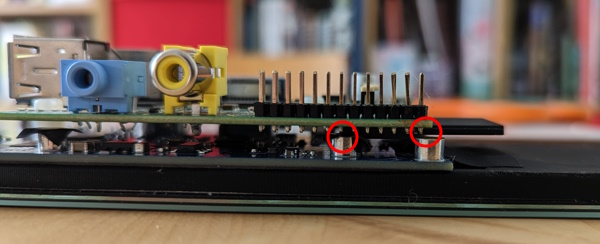
I worked around this problem by fitting some ~8mm nylon PCB spacers to the underside of the Pi to keep it from touching the other board, and for good measure covered any likely-looking contact points with electrical tape. I also taped over the very bright green LED on the screen’s PCB.
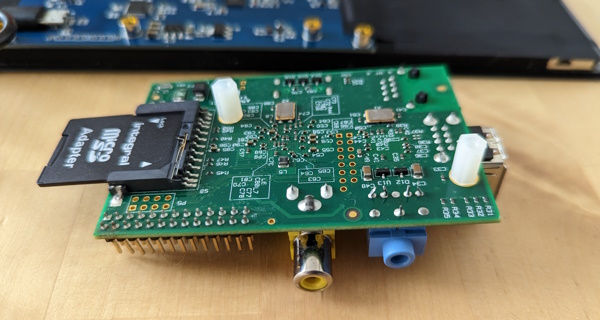
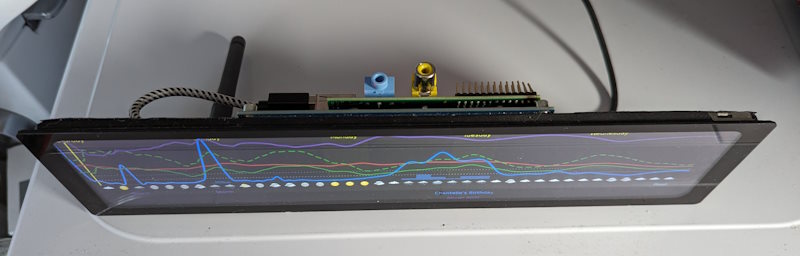
A later minor update swapped the included USB cable for a much shorter one to neaten up the back of the system:
The WiFi dongle is pretty huge, but it was the only working one I could scrounge from my parts bin. I turned it into a “design feature” by using it as a kick-stand; the rorateable antenna is just about stiff enough that it can be used to prop the unit up at whatever angle you desire.
Operating System Setup
Setting up the operating system was a little tricky due to the nature of the screen. I started by following the instructions from the Waveshare Wiki page, “Working with Raspberry Pi” section:
- Flash an SD card with the Raspberry Pi 32-bit standard desktop image, using the Raspberry Pi Imager
- Once complete, open
config.txton the SD card in a text editor and add the following:
max_framebuffer_height=1480
hdmi_group=2
hdmi_mode=87
hdmi_timings=320 0 80 16 32 1480 0 16 4 12 0 0 0 60 0 42000000 3
The wiki provides two ways of rotating the screen, one graphical inside the LXDE environment which is described as “for Raspberry Pi 4”, and the other by adding display_rotate=1 to config.txt, described as being “for older versions”. I found that display_rotate=1 only rotated the framebuffer display as the unit boots, and had no effect on the graphical environment, so I did not bother to set this. However, the graphical method of setting worked fine, even for my ancient Pi Model B.
But to get to that point, you have to get past the Raspberry Pi OS welcome screen. As you can see, it doesn’t fit on this strangely-proportioned screen, and neither is there any way to move it:
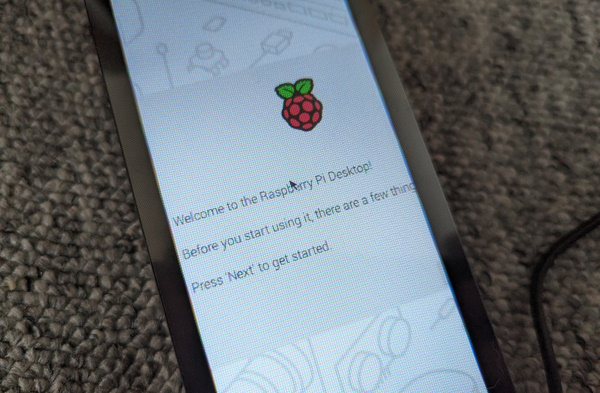
To get past this stage, I needed to connect the Pi to a normal monitor, keyboard and mouse. I used a USB hub so that I could keep my WiFi dongle connected as well on my 2-USB-port Pi.
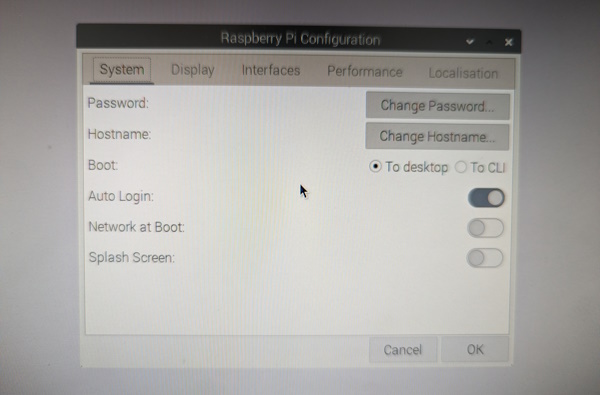
I then used the GUI configuration utility to enable automatic login in desktop mode, disable “screen blanking” (a 10-minute screensaver), and enable SSH. (The command-line raspi-config utility can also be used for this.) I also enabled VNC at this stage for easier debugging of GUI problems—this is unfortunately RealVNC rather than a F/OSS VNC implementation, but although the desktop clients will beg you to create an account, you don’t have to; the server is also free on the Pi.
I set the panel to auto-hide (right-click panel, Panel Settings, Advanced, Enable auto-hide) and its size when auto-hidden to 6 pixels. The 6 pixels is due to a later discovery that the touchscreen makes it hard to get the cursor to exactly the top pixel of the screen; setting it to be the top 6 pixels allows touch controls to bring up the menu much more easily.
I also configured the WiFi adapter to join my home network, and applied all available software updates at this point.
The remaining steps were to disable another aspect of screen timeout:
sudo echo "xserver-command=X -s 0 -dpms" >> sudo nano /etc/lightdm/lightdm.conf
And finally to rotate the screen, by going to Preferences, Screen Configuration, Layout, HDMI-1, Rotation, right. (Done last of course, because it’s very annoying to have the wrong rotation on your normal desktop monitor!)
After this was completed, I shut down the Pi and reassembled it back onto the rear of the screen, then started it up again.
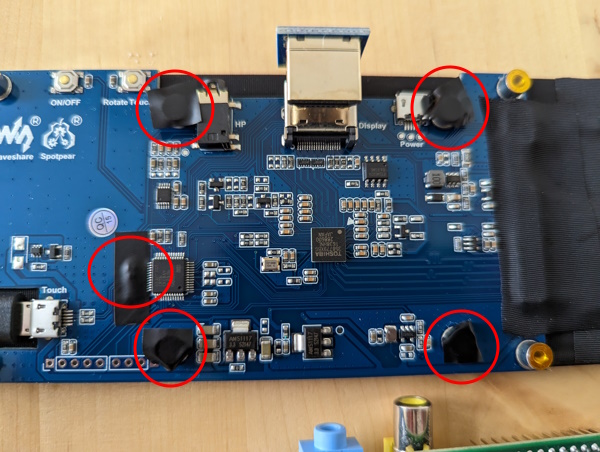
Initially the touchscreen controls were not rotated to match the screen; this was fixed by long-pressing (~5 seconds) the “Rotate Touch” button on the rear of the screen three times.
Software Setup
I then set up the meteogram software on the Pi. Raspberry Pi OS comes with Git, Python 3 and Pip preinstalled, so there’s nothing to do in that regard. As noted in the README of the repository though, I would need to install the scipy and numpy libraries from the package manager to preempt pip trying to build them from source.
I connected to the Pi via SSH and ran the following:
sudo apt install python3-scipy python3-numpy
git clone https://git.ianrenton.com/ian/home-meteogram-display.git meteogram
cd meteogram
pip install -r requirements.txt
chmod +x setwp.sh
(The pip install command took a long time on the old Pi!)
The repository includes a setwp.sh script which will run the python script, then set the generated output.png file as the wallpaper using pcmanfm, the default desktop renderer in the Raspberry Pi’s LXDE environment:
export DISPLAY=:0
export XAUTHORITY=/home/ian/.Xauthority
export XDG_RUNTIME_DIR=/run/user/1000

python meteogram.py
pcmanfm --desktop
pcmanfm --wallpaper-mode=stretch
pcmanfm -w "$PWD/output.png"
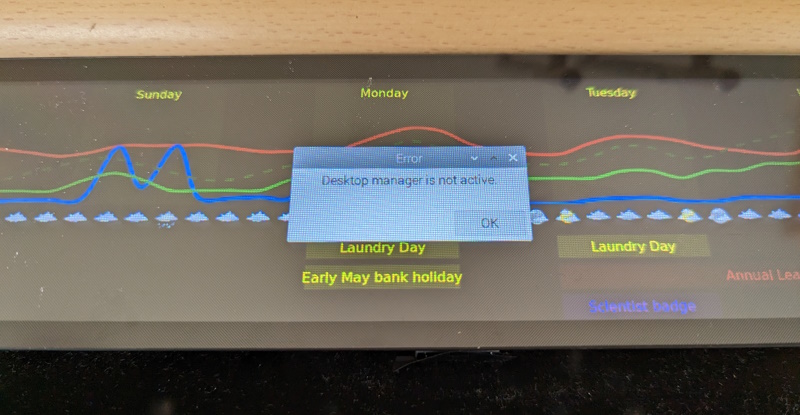
The --desktop command is to avoid a “Desktop Manager not active” alert on the GUI that I sometimes encountered when setting the wallpaper from the cron job—an annoying callback to all those photos of ATMs and train departure boards obscured by Windows error messages:
I then added a cron job on the Pi, running at one minute past the hour to give the API a chance to update, which calls the same script:
1 * * * * cd /home/ian/meteogram && ./setwp.sh
I also wanted to ensure the same script was run when the Pi was restarted, as soon as the graphical environment was available, so it displayed the output immediately rather than waiting until the next two-minutes-past-the-hour. To do this, I created a file at /etc/xdg/autostart/setwp.desktop with the following contents:
[Desktop Entry]
Type=Application
Name=setwp
Comment=Set wallpaper to Meteogram
Exec=cd /home/ian/meteogram && ./setwp.sh
The finishing touch on the Pi was to disable the cursor when not in use, so it’s not visible on the display under normal circumstances. I achieved this using the unclutter utility:
sudo apt install unclutter
unclutter &
echo "unclutter &" >> ~/.xinitrc
The setup of hardware and software was then complete.
Enclosure & Mounting
Coming soon [cetacean needed]
Future Improvements
I may consider replacing the original Model B with a Pi 4. This would mount properly on the screen with the included adapters for a neater fit, and has built-in WiFi. However, given the extremely minimal system requirements of the project, this seems like a waste of a much more powerful device.
I would also like to add time-based or automatic control of the screen backlight brightness. This is unfortunately not a simple software change but one that requires hardware mods and so will wait until another day!
Comments