As explained in my initial blog post on the subject, while Plane/Sailing works very well, its biggest limitation is where I live, and the lack of line-of-sight to the sea or any APRS digipeaters. The “portable” concept developed as a solution to that problem, and an exercise to see how small an extra feeder into the system could get.
Goals
My requirements for the system were as follows:
- Fit within a 100x40x40mm footprint
- Be made entirely of commercial off-the-shelf parts (no PCB design!)
- Be plug-and-play (little or no soldering involved)
- Be configurable to receive ADS-B, AIS or APRS—one at a time
- Have a fourth operating mode where it is usable as a generic network-connected SDR
- Able to feed data to Plane/Sailing as well as common web-based trackers
In this first iteration of the system, I allowed myself to rely on there being power and WiFi available at the operating location—e.g. wall power socket, car cigarette lighter socket or handheld USB power bank, and household WiFi or phone hotspot. I also allowed that changing the function of the device between its four supported modes could be done via SSH. (See later for potential future developments removing these limitations.)
Design
For the radio receiver, I chose the RTL-SDR Blog v3. There were a number of reasons for this, including familiarity with the device and it having the widest range of software support. It’s what I use three of in the main Plane/Sailing system, so I knew for sure it would work.
The v4 was rejected as it was very new to market, and software compatibility could not be guaranteed. Cheaper DVB-based SDR dongles were rejected due to an expectation of poorer performance. The CaribouLite would have been my first choice due to the pHAT form factor that would have made the unit much neater, but their issue tracker did not fill me with confidence it would actually work.
For the computer itself, I chose the Raspberry Pi Zero W, which has built-in WiFi.
To join the two neatly, I chose a Zero4U USB hub and a back-to-back USB A connector. The Zero4U drove the choice of a Pi Zero W as opposed to a Pi Zero 2 W, as compatibility was not guaranteed due to a slight change in pin positions between the two versions.
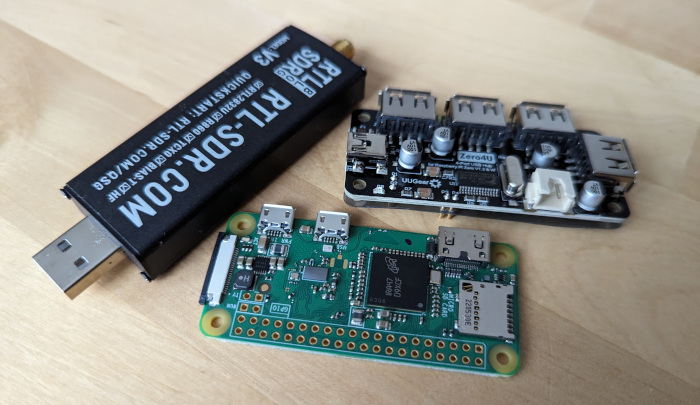 Parts ready to be assembled
A simple perspex “case” and some PCB spacers makes the build rigid, though far short of rugged, then an SD card and an SMA telescopic whip antenna (purchased with the RTL-SDR from Technofix) completes the hardware.
Bill of Materials
The following parts were used to build the project in its current incarnation:
| Part | Supplier | Cost / GBP |
|---|---|---|
| Raspberry Pi Zero W | The Pi Hut | 15.00 |
| SD Card | (from parts bin, but cheaply available e.g. Amazon) | N/A |
| Zero4U USB Hub | The Pi Hut | 9.90 |
| RTL-SDR v3 | Technofix | 37.99 |
| Telescopic whip antenna | Technofix (addon to above product) | 3.99 |
| USB A back-to-back connector | AliExpress | 4.01 |
| Raspberry Pi Zero W perspex case | eBay | 2.68 |
| 2.5mm PCB spacers | (from parts bin, but cheaply available e.g. Amazon) | N/A |
| TOTAL | 73.57 |
Add a Comment